If 2020 taught us anything, it’s that remote teaching is difficult, regardless of which format you use. To do it well requires training, experience, mentoring, and ongoing coaching and support. The speed with which districts needed to pivot to remote models and the massive scale of this undertaking often did not allow for administrators or teachers to receive the supports necessary to make the adjustment easier. Yet, everyone stepped up and did the best they could with the knowledge and resources they had. All educators need to be commended for their efforts during this challenging time.
For the last eight years, I have been designing remote and hybrid learning models, training educators in how to engage learners in these formats, and most recently, supporting K-12 schools with their implementation of remote learning during the pandemic. I made many mistakes when I first started, but over time, my colleagues and I developed some effective and practical methods for online and hybrid learning that can make the process easier.
Managing Our Cognitive Load
Teaching is a cognitively demanding profession. Pandemic aside, we are constantly thinking about a wide variety of elements within a given lesson (content, pacing, students’ needs, behaviors). Our working memory is constantly on overdrive.

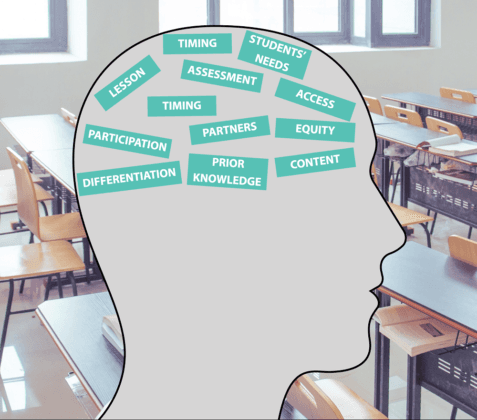
Now, add all of the new technical elements that hybrid teaching requires and you’ll notice that we actually crowd out the normal lesson considerations in order to make space to think about all the technology we need to manage.

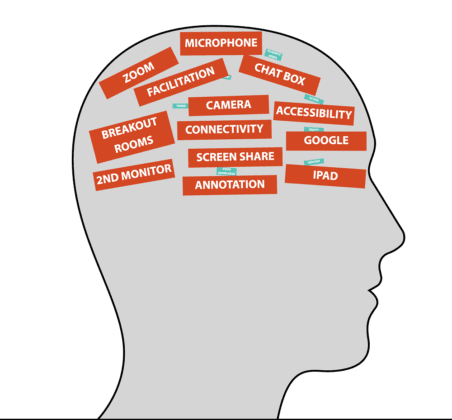
Unfortunately, we can only hold onto so much information at any given time. A common reaction when there are too many new technical elements to manage is to revert to more didactic forms of instruction. However, when we simplify the technical aspects, we can focus more on the teaching and learning processes as the remote teaching becomes less overwhelming. In a lot of ways, supporting good online teaching is about reducing teachers’ cognitive load.
For example, not everything needs to be digitized in remote learning. Often, having students work with pen and paper makes the work more accessible, easier to manage, and it certainly reduces the cognitive load for the students and teachers. The concern with having students work with pen and paper is that teachers can’t monitor the work. However, there are some easy steps you can take to make observing students’ work with pen and paper possible.
Hold Up Work:
When students need to share their work, they can simply hold their paper up to the camera so teachers and/or classmates can see their work. If the paper needs to be visible for longer than a few seconds, teachers or classmates can take a screenshot and share the image with the rest of the group via screen sharing.

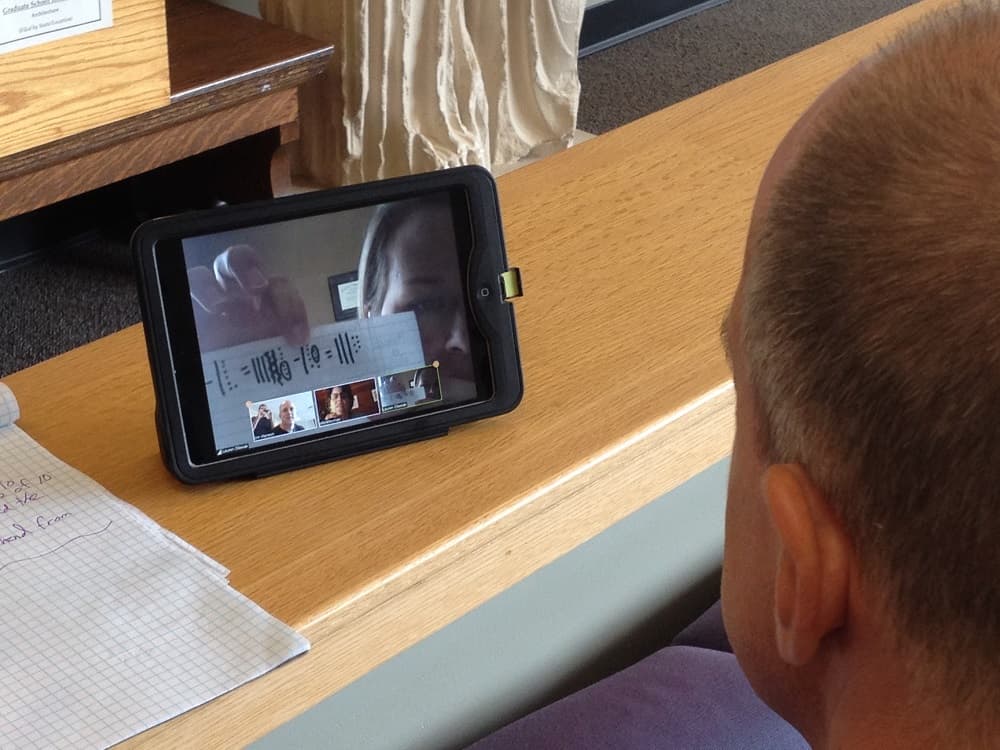
If the students need to turn in their work, the screenshots can be uploaded and shared with the teacher. The simplicity of this process takes the pressure off teachers to create digital workspaces for every activity they do with students. Students will also welcome a familiar medium.
Work Mode:
There is an assumption that when we are video conferencing, we need to keep the cameras focused on our faces. However, when students are working on paper, I want to see their work and not their faces. Work mode is what I call the position we put our devices in so that the camera is capturing the work and not the students. If students are using laptops, they just angle their screens down. If they are using tablets, they can select the rear-facing camera and turn their device around.
The students’ focus while in work mode should be on the work they are doing on paper. If they need to see their screen, they can simply switch the angle to make their screens visible.
The benefit of work mode is that the teacher can see all the students’ work in real time. One teacher I trained in this method told me that she can observe more students this way than she can when she’s in the physical classroom because she doesn’t have to walk around in order to see different students. They’re all right in front of her on the same screen.
Both of these tricks reduce the reliance on technology, so students and teachers are not having to juggle different apps and learning management systems. If I want to see my students’ strategies for multiplication, pen and paper will get me that information faster and easier than setting up a Jamboard to capture the same idea.
Simplifying Hybrid Learning
One of the challenges with hybrid models is that there is such a steep learning curve with the technology, logistics, and facilitation. The problem is that teachers are often tossed right into that environment and they have to figure out everything at once. What follows is a progression of ideas that will help educators get started with hybrid teaching in a way that preserves their mental energy.
Stage 1 – Start Small
Hybrid learning classrooms do not need to be decked out like television studios with multiple cameras and microphones. In fact, you can run a successful hybrid classroom with just a laptop. If you begin with just the basic aspects of a hybrid learning classroom, you can get a grasp of the mechanics and essential elements. Consider the following basic setup from a training I recently conducted for high school teachers who were setting up hybrid basic spaces using just a laptop:

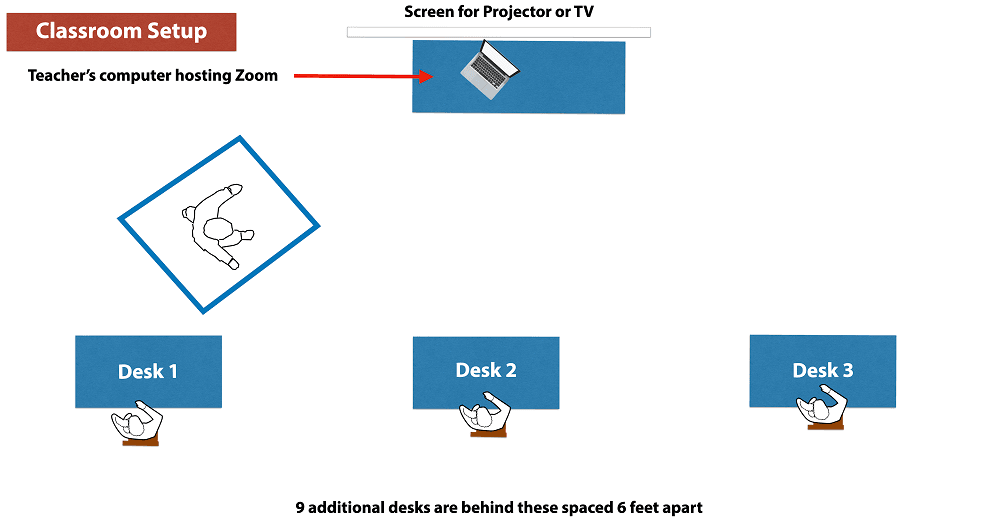
- Position your laptop in front of the screen where online students will be displayed so that it replicates making eye contact whenever you look at your online students on the screen.
- Decide on your main teaching spot and ensure you are visible to both online and in-person students. It’s helpful to make sure you can easily see both groups of students as well.
- Conduct a quick sound check by having a colleague join your video conference and make sure you can be heard clearly. If necessary, move closer to your laptop.
- Once you have identified your ideal teaching spot, figure out how far you can move in all directions while still being on camera. Then mark the floor using tape (I recommend blue painter’s tape, which is easy to clean up) to identify the boundaries.
This setup is inexpensive and won’t break school budgets. Additionally, it allows teachers to run the video conference off their laptops just as they did while teaching fully remote classes, which frees up mental energy to focus more on teaching and learning.
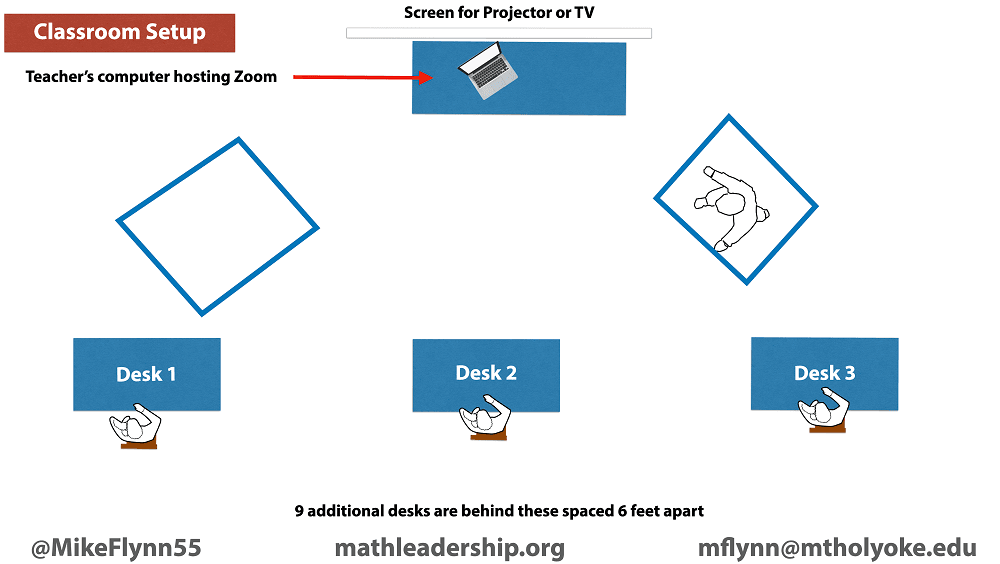
Stage 2 – Add a Second Teaching Spot
Once teachers are comfortable with the basic model, they can begin to think about having another spot in the classroom where they can teach. This provides more mobility and another view of the classroom for the online students. After the second area is marked with tape, it is easy for teachers to move between both spots.

To make turning your laptop smoother, buy an inexpensive plastic Lazy Susan base and place it beneath your laptop. You can the turn your laptop smoothly and easily to capture other parts of the room.
Stage 3 – Add a Secondary Device
As teachers become comfortable teaching with one device and in other areas of the classroom, they can consider adding a secondary device such as an iPad or smartphone to have another camera as part of their system. To do this, you simply join your video conference with your secondary device. Do not connect the audio or you will create a feedback loop.
Having a smartphone or tablet as a secondary camera will give teachers greater flexibility and provide more access to the classroom for the online students. For example, if a biology teacher is conducting a lab where students are dissecting frogs, it is not possible for the online students do the actual dissection from home. However, if the iPad is positioned to capture a student’s desk in the classroom, the student in class can be a lab partner for the students that are attending class online. That way, the online students can interact, ask questions, offer suggestions, and participate more in the process. Position the device in the area of the room that you want to capture, and when you are ready to teach from that part of the room, spotlight your secondary device so all students online see that camera instead of the one from your laptop.
You can also use the secondary device as a document camera. If you have a tripod, you can angle your device downwards to capture an area on a desk where you would place documents. If you don’t have a tripod, you can use a milk crate positioned on its side. You can then place anything you want to display inside the crate.
Final Considerations
It is important to note that while a basic setup for hybrid learning takes some pressure off teachers, it also will not produce the best quality audio and video for students. In my view, the most important thing teachers can do is provide rich and meaningful instructional experiences for their students. I’ll take an engaging lesson that’s streaming from the teacher’s laptop over a boring lecture in high definition any day.
Any additional equipment (microphones, cameras, secondary devices, etc.) are simply extensions of this basic model I described above and serve to make the audio and video better for the online students. Some of these upgrades do not overly complicate the management of hybrid learning. For example, if a teacher had an omnidirectional conference room microphone attached to their laptop, they could have the added flexibility of being able to teach further away from their laptop, but the rest of the setup is basically the same. Other upgrades have a steeper learning curve, like using a webcam that you pre-program to point to different parts of the classroom. In order to effectively use the equipment, teachers would have to learn how to program the equipment and operate it during lessons.
My overarching advice when it comes to supporting hybrid learning is to consider the needs of each individual teacher and have flexible plans that allow for some to ease into the technology and others to have access to tools and resources that will help them implement more advanced hybrid learning strategies. At the end of the day, engaging online lessons still come down to the learning experiences that teachers design. Remember, technology doesn’t engage students. Teachers do.
All images and figures in the text of this post are courtesy of the author.